Getting Started In Astrophotography: Setup Examples for Each Style
When getting started in Astrophotography, there is a lot to consider with your setup. You should ask yourself which kind of images you would like to take. Widefield night time landscapes? Constellation or star field shots? Deep Sky Objects? What about Solar System Objects?
There is no right or wrong style to choose, each has a different approach that can be very rewarding. There are different equipment requirements, although there can be some overlap. In this post, I’ll explain different styles and setups, and what you will need to get started with that style of astrophotography.
Night Time Landscapes
Description of Landscape Style Astrophotography
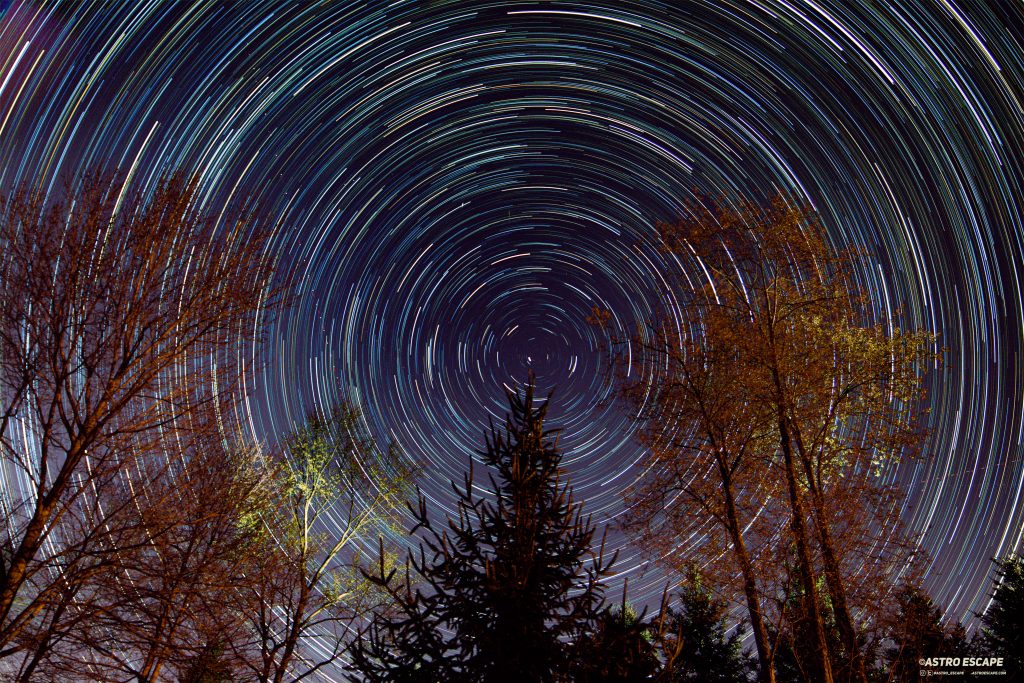
Frequently, this is the place where most get started in astrophotography. Night time landscape photography is a style that includes a starry sky and something on Earth in the foreground. In the sky, the most common style is a shot including the Milky Way. You don’t need to have the Milky Way be the subject, a constellation rising over the horizon is another common subject. Or, capturing the rotation of the Earth in the form of Star Trails pictures is another route to go. Commonly for the foreground, nearby trees or hills are included in these style of picture. The challenge with night landscapes is that the photographer needs to be located where there is a minimal amount of light pollution. This is so the features of the night sky really “pop.”
For the setup, this is the simplest: just a camera and tripod. I would recommend using a remote shutter cable, but you don’t need one. Cameras commonly come equipped with self timers, and you can use that in lieu of a cable. The reason for this is that you need to reduce vibrations when pressing the shutter button. All of the styles require the camera to be as still as possible to create a sharp image, so be prepared to minimize vibrations.
The Setup for Landscape Astrophotography
A common camera to use is a DSLR, which can be used in the next two styles. However, modern cell phones are becoming quite good with their cameras. I would expect mid-to late 2020’s to have cameras on par with DSLR’s in quality of pictures at night. Another easy option is a standard point and shoot camera, just make sure it has manual mode because you will need it.
If you decide to use a DSLR, lenses are important. This style works best with wide field lenses. The smaller the number in millimeters, the better. This allows the picture to capture as much sky and ground as possible. A great beginner lens is the Rokinon 14mm lens. Using that lens, I captured the Milky Way picture at the top of this section. But, it is common to stay below 35mm for this style to keep the ground included in the frame.
When it comes to the tripod, it needs to be stable. No way around this, for all styles. If your focus is night scape photography with some daytime photography, a great tripod is this Neewer Carbon Fiber Tripod. It’s very stable, compacts down well, and light weight. A stable, lightweight tripod is a must if you must walk a little bit to your shooting location.
Out of all styles, this is the cheapest. The range can go anywhere from $300 to $1000 USD based on what you already own, and whether or not you can find the gear used.
Constellation/Starfield
Building off of landscape, the next style works its way into the night sky with no foreground. The focus is the sky. This style allows for capturing a single constellation, or maybe the star-filled core of the Milky Way. The difference here is that a new piece is added to the kit.
With this style, you will be zoomed in a little more to the sky, and it presents a problem: sharp stars. The Earth’s rotation is so fast that short exposures can create unwanted star trails. But, there is a way around that.

The Setup for Constellation/Starfield Astrophotography
While you will still need the items from the previous kit, you will also need a star tracker. This device counteracts the issues with star trails, and rotates with the Earth. Most of them are portable, which is great if you need to walk a little bit to where you are setting up. The more robust trackers, like often-recommended , are a little heavier if you plan on using the counterweights. Even with the counterweights, it is still a very portable kit. Keep in mind a stable tripod is necessary when using a tracker, more so than before. If you are using the Skywatcher Star adventurer, the best one for it is the . Luckily, it is cheaper than the Neewer tripod above.
When it comes to camera lenses, this is where you can start going with higher focal lengths. It is common to see anywhere from 18mm to 200mm in focal length, depending on the desired subject of the picture. 50mm is a common lens size used for starry Milky Way core and Constellation photos, while 135mm and above is where some may take their first steps into the next style.
When it comes to cost, the added cost of a star tracker averages around $400 on top of the price of the above kit. Adding lenses can also increase the price another $300 to $500 depending on what you buy, and whether or not you can find one used.
Deep Sky Objects
Here’s where we create the beautiful images of galaxies and nebulae you’ve most likely seen around the internet. Deep sky astrophotography usually starts with a kit similar to the one above using a star tracker. However, it can quickly transform into a permanent setup that is capable of imaging objects not easily obtained with a star tracker and a camera lens. Not only will you need hardware, but you’ll need software as well, to control the gear.

Control Software
When it comes to hardware and software, this is where things get interesting. There are many options, such as laptop control, using a device like the ASI AIR Plus, or simply using the hand controller…. which is the least recommended. My personal recommendation for getting started in Deep Sky Astrophotography is to use an ASI AIR Plus, and you can find my setup guide here, should you decide to go that route.
Hardware: The Setup
For hardware, as I mentioned a star tracker is a good starting point. But if you have any desire to image faint objects, you will need a mount. When selecting a mount, it is advantageous to get the largest your budget can allow, and that you are capable of transporting if necessary. A common recommendation all across the community is the Skywatcher EQ6-R, as it has the capability to handle large telescopes. What this means, is that even if you start with a small refractor, you’ll have the ability to upgrade to larger scopes in the future without needing a new mount. However, going this route will cost an average of $2000 as of the time of writing this.
For telescopes, refractors are the big dog here. Most objects you’ll begin with can be easily captured with a small refractor. A common size to start with is a 61mm, which can produce some great images of Andromeda and other large objects. Depending on your mount, larger refractors can allow for capturing details in objects that appear smaller from Earth. Any larger than around 800mm in focal length, it might be beneficial to switch from a refractor to either a Newtonian Reflector, or a Schmidt-Cassegrain style telescope, as those are cheaper and offer longer focal lengths. Use caution when starting out, however, as those telescope require extra maintenance steps before use. The cost of the telescope can start around $500, but can easily go up to about $2000 if you go with a large focal length.
Solar System
The last style is where we capture our local Solar System. Our corner of the Galactic neighborhood has some wonderful objects orbiting our own star. Here’s where it gets interesting: it uses a little bit of each other style, including some tricks from daytime photography, and could possibly be during the daytime! Depending on the object, you may be taking regular photos, taking long exposures, or the newest addition, taking video. Brighter objects such as the Moon can be taken like a regular daytime picture using fast shutter speeds, especially when shooting the full Moon.
Jupiter and Saturn, however, are frequently taken using video. This is so fast shutter speeds can be used, but more frames are taken than a normal photo using the same shutter speed. This allows for more data to be collected for the final stack. Comets can be a cross between deep sky objects and planets, based on how bright it is. My below picture of Comet Neowise was with a short stack of 30 second exposures.

Solar System Hardware
Solar system hardware varies the widest. A full Moon can be captured with a camera, tripod, and long focal length lens, even a 70-300mm kit lens can work. For lunar eclipses, however, you’ll use long exposures due to how dim the Moon will be. In all cases with the Moon, if the Moon is the only target you will benefit from using a star tracker or mount to keep things nice and sharp.
But going into the planets, you’ll want large focal lengths, 1200mm or more. The bigger, the better, and it should be on a mount capable of tracking the planet. On top of that, for cameras you’ll want a small sensor size. This is so the planet fills the frame as much as possible, to capture details. If you’ve always wanted a picture of Saturn, but don’t have that setup, you CAN get a decent picture with your cell phone and a Dobsonian, but you’ll get more detail with a larger, tracking setup.
There’s one object that changes the game entirely: Solar Imaging. Taking images of our star presents other challenges in itself. The Sun is so bright that you need to have filters designed to protect the camera (or your eyes for visual observing).
The cost for Solar System imaging varies the most. It can start at the cheap end just like landscape. But, if you choose solar imaging, it can easily get to tens of thousands of dollars for a Lunt Solar Telescope.
Closing Remarks
There are different styles of astrophotography that everyone can enjoy. Every style is rewarding in its own way but they also have unique challenges that can be quite enjoyable. If you are about to take your first images of the Moon, swing over and check out my Moon Processing guide.
DISCLAIMER: This website and descriptions of items may contain affiliate links, which means that if you click on one of the product links, I’ll receive a small commission at no extra cost to you. This helps support the website running costs and allows me to continue to produce reviews or guides like this. Thank you for the support!