Making Your Device RED

Introduction
In astrophotography it is inevitable that you will use a screen of some sort to control your gear. Whether you are using a PC, Phone, or Tablet, almost all gear requires external control. To protect your night vision and those around you, your screen needs to be tinted red, and be as dim as possible. This also helps your light pollution footprint if you are say, at a star party. In this article, we are going to go over how to turn your screen red on all common operating systems and devices.
Making Your Device Red – Things to Keep in Mind
In the past, you almost always had to get a red film to put over your screen, but with night mode being extremely common, it’s easy to tweak the settings to get it to a deep red. A few caveats though, for DSLR’s, you still need to add a film, I haven’t found one that allows you to set it to red. For desktops/laptops, you can get the screen pretty red but just know that some manufacturers may allow different intensities. If you are putting together a new computer to run your gear, something to keep in mind:
When purchasing a monitor, there are a few monitor styles you need to be aware of. Without going too deep into the topic, going with an OLED monitor is best, so the blacks are as deep as possible. With OLED’s, black pixels are not lit making the overall image darker. However, they are still pricy. If it’s a little to pricy or you are putting money elsewhere, there are plenty of cheap VA-type monitors on the market. VA is better for the contrast at night to make things easier to read. You can find an explanation of each style here.
Beyond that, we can modify the colors being output to the screens. First, let’s go over Windows.
Making Your Device Red – Windows 10/11
When you are using a Windows computer to control your gear, you can easily set it to a deep red.
Basic Red Mode
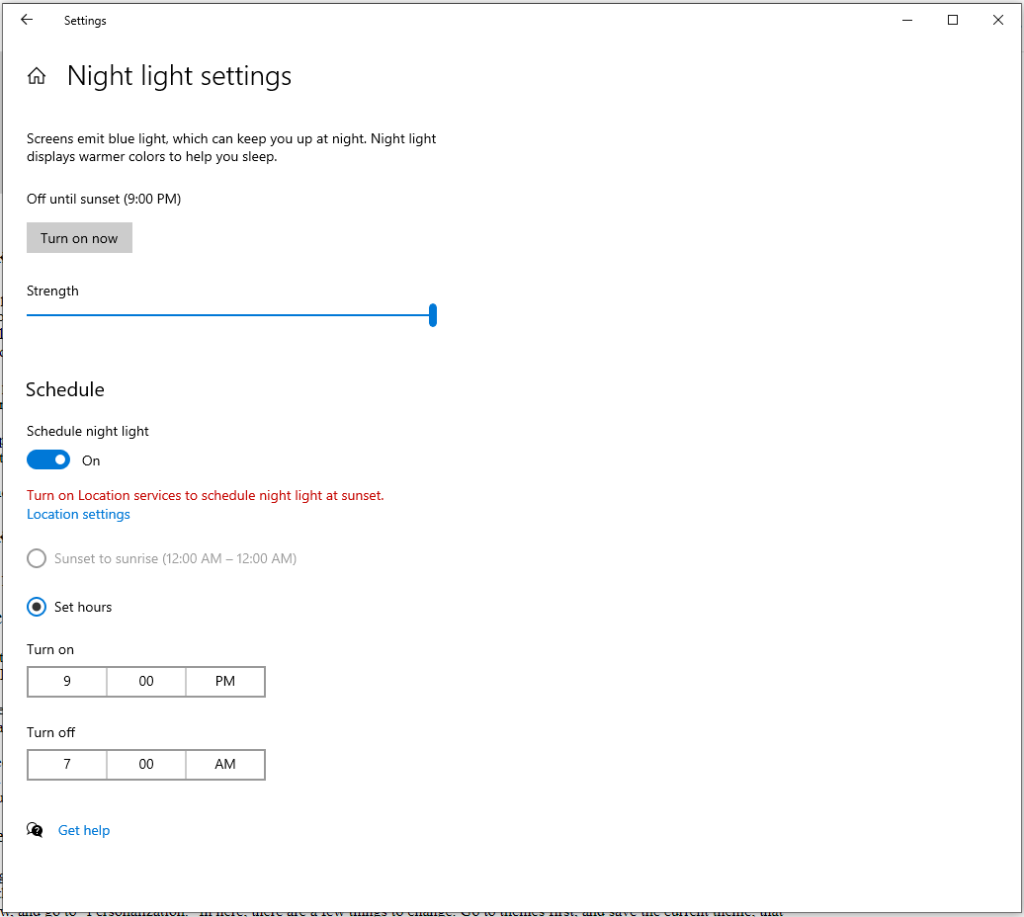
First step is to go into Settings, then go to System. From there, click on Display on the left. On the right hand side, scroll down to Night Light, and click on “Night Light Settings.”
In here you have a couple of options. The first one is the slider. If you set that all the way to the right, it will turn your screen red. You can click “turn on now” to preview it.
The second thing to do, if you want, is to schedule it. If you want, you can set it for certain hours, or if you have location services turned on, you can do sunset to sunrise. Almost all systems have this capability in their respective settings, so the choice to schedule it is yours.
In Depth Red Mode
Having just a red screen can be good enough, but we can go further. We can set the theme to have a black and white feel to it, so all of the text and icons are black and white. When the night light is on, the text will be red. To do this, go back to the main settings window, and go to “Personalization.” In here, there are a few things to change. Go to themes first, and save the current theme, that way all colors go back to what you normally have if you intend on switching back.
Next, click on background and set it to solid black. If you want, you can set the mouse cursor to black by clicking on “Mouse Cursor” and setting it to a black mouse. Then go to Colors, and set it all to dark, with the accent color being as dark as possible.
After you are done with that, go to Themes on the left, and save your theme. Now we need to make everything else black and white. For that, scroll down and go to high contrast settings. You’ll want to set a few options here: Set text to White, hyperlinks to yellow, disabled text to green and background to black. For selected text and button text, make sure the color that is more prominent is either red or black. Doing this will make everything easier to read. Afterwards, save the theme under a custom name, I am calling this red mode.
One more thing to set up. Go to Color filters on the left, and make sure the color filter is set to grayscale. This makes it all black and white. Setting the previous colors in high contrast makes sure the gray version is easily readable.

Easily Toggle Red Mode
For both High Contrast and color filters, there is a keyboard combination you can use to toggle those. If you want to use those, go ahead and memorize them or make a note of them. Otherwise, there are programs like AutoHotKey or AutoIt that can make it as simple as pressing a button. The choice of program is yours, but you’ll need to check out one of the many excellent guides for your chosen program. To toggle the Dark Mode theme, a free to use program called “Easy Dark Mode” can help with switching. Once you have it as red as it can go, the last thing to do is change the brightness on your desktop monitor or laptop monitor to as dim as possible.
Look at how well your eyes will be preserved!
Making Your Device Red – Android
For Android devices, the setup is easy, AND you can make an easy way to toggle it. All of this is done in the settings app. Keep in mind that steps may be slightly different based on version.
In Settings, go down to accessibility, then visibility. Color lens is the first step, it turns everything red. If you are having an issue reading some fonts, you can turn on high contrast mode. Last, go back out and go to Display. Here, turn off adaptive brightness, and dim the screen. That’s it!
Note: in the below picture, the red only goes to sixty percent. Some models can go deeper red!

Making Your Device Red – Mac/iOS
For Apple devices, I am looping all major versions together, because the steps are the same. They are also similar to the Android steps, which makes things even easier! For phones I am using iOS 16, and for desktop/laptop, I am using iOS 12, Monterey.
Just like before, go to Settings, then Accessibility. In Accessibility, go to Display & text Size. Scroll down to color filters. From there Select color tint. Set the intensity all the way to the right, and the hue all the way to either the left or the right, doesn’t matter, both ends make it red.

Now let’s make it faster to turn on for your phone. While in accessibility, back out and go to Touch and scroll down to the bottom. Select Back Tap. Here, you can pick double or triple tap, the choice is yours but I will be choosing triple tap. After choosing, scroll down to color filters and select that. Now, when you triple tap the back of the phone on the fingerprint reader, it will turn red mode on and off.

The last thing to do is turn the brightness all the way down.
Making Your Device Red – Linux
While linux is the least used of the bunch, there are still ways to run your gear from within Linux. That being said, you can make Linux red too! Now, this example is using Ubuntu.
Similar to the previous, you’ll head into Settings. from here, there are a couple of easy things to do. First, look for Display or Display and Monitor, based on your version. In next, look for “Night Light” or “Night Color.” To make it easy, the developers had added in color temperature, just set it to the warmest possible. This will make it red, or in some versions a deep orange which is better than nothing. For all versions, you can set a timer or have it go from Sunset to Sunrise to make it easy to turn on and off.
The other thing you’ll want to do is set the theme. Back in settings, go to appearance. You can set a baked in dark mode here.

As usual, turn down the brightness on the monitor!
Video
If you would prefer to follow along, you can check out my video about this:
Conclusion
When making your device red, you save your night vision if you plan on doing visual astronomy, and your neighbor at a star party will be happy with your settings.
DISCLAIMER: This website and descriptions of items may contain affiliate links, which means that if you click on one of the product links, I’ll receive a small commission. This helps support the website running costs and allows me to continue to produce the content hosted here. Thank you for the support!